The Return of Serif

It feels funny to think that back in the early 1990s Serif was known for PagePlus, in the days when such things were known as desktop publishing or DTP applications.

Recently, however, they’ve produced Affinity Photo for Mac, Windows and iPad. After one or two folks recommended it, I thought it was time to add another trick to the photo-publishing workflow and have a play. After all, if nothing else, having an iPad would solve my doubts with colour-management issues on Linux, wouldn’t it?

So I’ve spent a few weeks driving around hunting scenery and taking photos of it and gradually evolving a few routines: photos are still shot on the Pentax K-1; processed (variously pixel-shift or HDR) using dcraw on Linux, where I also run them through darktable for a lot of toning work; the results are then copied to an ownCloud folder which synchronizes automagically with the iPad; a bit of juggling with share-to-Affinity and share-to-Photos and share-to-ownCloud later and the results are copied back to the workstation for final organization, checks and publication.

Within Affinity, my workflow is to import an image and ensure it’s converted to 16-bit P3 colour-space – this is a bit wider than sRGB and native to the iPad’s display. I then run the Develop module which tweaks exposure, brightness and contrast, clarity, detail, colour-balance (not so much), lens distortions, etc. After that, I use layers to remove sensor-dust and other undesirable feature. Top tip, use a new pixel layer for the in-painting tool set to “this layer and below”; then all the in-paintings can be toggled on and off to see the effect; also use a brightness+contrast adjustment layer above that while you work, so the corrections will be even less visible when the contrast is reduced back to normal. If the image requires it, I’ll add one or two fill layers for gradients – better to use an elliptical gradient that can be moved around the scene than a vignette that only applies in the corners. Finally, I merge all the layers to a visible sum-of-all-below pixel layer,on which I run the Tonemapping persona; ignoring all the standard presets (which are awful), I have a couple of my own that make black-and-white in low- and high-key targets, in which I can balance local versus global contrast. If I produce a black&white image, it probably arises from this layer directly; sometimes, dropping the post-tonemapped layer into the luminosity channel makes for a better colour image as well (subject to opacity tweaking).

So, some results. It produces colour:

It produces black and white:

One final thing: I used to hate the process of adding metadata – titles and descriptions, slogging through all my tags for the most pertinent ones, etc. Because the ownCloud layer is so slow and clunky, it makes more sense to be more selective, choose fewer photos to go through it; if I also add metadata at this stage, I can concentrate on processing each image with particular goals in mind, knowing that all future versions will be annotated correctly in advance. Freedom!

Pentax K-1: an open-source photo-processing workflow

There is a trope that photography involves taking a single RAW image, hunching over the desktop poking sliders in Lightroom, and publishing one JPEG; if you want less noise you buy noise-reduction software; if you want larger images, you buy upscaling software. It’s not the way I work.

I prefer to make the most of the scene, capturing lots of real-world photons as a form of future-proofing. Hence I was pleased to be able to fulfil a print order last year that involved making a 34″-wide print from an image captured on an ancient Lumix GH2 many years ago. Accordingly, I’ve been blending multiple source images per output, simply varying one or two dimensions: simple stacking, stacking with sub-pixel super-resolution, HDR, panoramas and occasionally focus-stacking as the situation demands.

I do have a favoured approach, which is to compose the scene as closely as possible to the desired image, then shoot hand-held with HDR bracketing; this combines greater dynamic range, some noise-reduction and scope for super-resolution (upscaling).

I have also almost perfected a purely open-source workflow on Linux with scope for lots of automation – the only areas of manual intervention were setting the initial RAW conversion profile in RawTherapee and the collation of images into groups in order to run blending in batch.

After a while, inevitably, it was simply becoming too computationally intensive to be upscaling and blending images in post, so I bought an Olympus Pen-F with a view to using its high-resolution mode, pushing the sub-pixel realignment into hardware. That worked, and I could enjoy two custom setting presets (one for HDR and allowing walk-around shooting with upscaling, one for hi-res mode on a tripod), albeit with some limitations – no more than 8s base exposure (hence exposure times being quoted as “8x8s”), no smaller than f/8, no greater than ISO 1600. For landscape, this is not always ideal – what if 64s long exposure doesn’t give adequate cloud blur, or falls between one’s ND64 little- and ND1000 big-stopper filters? What if the focal length and subject distance require f/10 for DoF?

All that changed when I swapped all the Olympus gear for a Pentax K-1 a couple of weekends ago. Full-frame with beautiful tonality – smooth gradation and no noise. A quick test in the shop and I could enable both HDR and pixel-shift mode and save RAW files (.PEF or .DNG) and in the case of pixel-shift mode, was limited to 30s rather than 8s – no worse than regular manual mode before switching to bulb timing. And 36 megapixels for both single and multi-shot modes. Done deal.

One problem: I spent the first evening collecting data, er, taking photos at a well-known landscape scene, came home with a mixture of RAW files, some of which were 40-odd MB, some 130-odd MB; so obviously multiple frames’ data was being stored. However, using RawTherapee to open the images – either PEF or DNG – it didn’t seem like the exposures were as long as I expected from the JPEGs.

A lot of reviews of the K-1 concentrate on pixel-shift mode, saying how it has options to correct subject-motion or not, etc, and agonizing over how which commercial RAW-converter handles the motion. What they do not make clear is that the K-1 only performs any blend when outputting JPEGs, which is also used as the preview image embedded in the RAW file; the DNG or PEF files are simply concatenations of sub-frames with no processing applied in-camera.

On a simple test using pixel-shift mode with the camera pointing at the floor for the first two frames and to the ceiling for the latter two, it quickly becomes apparent that RawTherapee is only reading the first frame within a PEF or DNG file and ignoring the rest.

Disaster? End of the world? I think not.

If you use dcraw to probe the source files, you see things like:

zsh, rhyolite 12:43AM 20170204/ % dcraw -i -v IMGP0020.PEF

Filename: IMGP0020.PEF
Timestamp: Sat Feb  4 12:32:52 2017
Camera: Pentax K-1
ISO speed: 100
Shutter: 30.0 sec
Aperture: f/7.1
Focal length: 31.0 mm
Embedded ICC profile: no
Number of raw images: 4
Thumb size:  7360 x 4912
Full size:   7392 x 4950
Image size:  7392 x 4950
Output size: 7392 x 4950
Raw colors: 3
Filter pattern: RG/GB
Daylight multipliers: 1.000000 1.000000 1.000000
Camera multipliers: 18368.000000 8192.000000 12512.000000 8192.000000

On further inspection, both PEF and DNG formats are capable of storing multiple sub-frames.

After a bit of investigation, I came up with an optimal set of parameters to dcraw with which to extract all four images with predictable filenames, making the most of the image quality available:

dcraw -w +M -H 0 -o /usr/share/argyllcms/ref/ProPhotoLin.icm -p "/usr/share/rawtherapee/iccprofiles/input/Pentax K200D.icc" -j -W -s all -6 -T -q 2 -4 "$filename"

Explanation:

  • -w = use camera white-balance
  • +M = use the embedded colour matrix if possible
  • -H 0 = leave the highlights clipped, no rebuilding or blending
    (if I want to handle highlights, I’ll shoot HDR at the scene)
  • -o = use ProPhotoRGB-linear output profile
  • -p = use RawTherapee’s nearest input profile for the sensor (in this case, the K200D)
  • -j = don’t stretch or rotate pixels
  • -W = don’t automatically brighten the image
  • -s all = output all sub-frames
  • -6 = 16-bit output
  • -T = TIFF instead of PPM
  • -q 2 = use the PPG demosaicing algorithm
    (I compared all 4 options and this gave the biggest JPEG = hardest to compress = most image data)
  • -4 = Lienar 16-bit

At this point, I could hook in to the workflow I was using previously, but instead of worrying how to regroup multiple RAWs into one output, the camera has done that already and all we need do is retain the base filename whilst blending.

After a few hours’ hacking, I came up with this little zsh shell function that completely automates the RAW conversion process:

pic.2.raw () {
        for i in *.PEF *.DNG
        do
                echo "Converting $i"
                base="$i:r" 
                dcraw -w +M -H 0 -o /usr/share/argyllcms/ref/ProPhotoLin.icm -p "/usr/share/rawtherapee/iccprofiles/input/Pentax K200D.icc" -j -W -s all -6 -T -q 2 -4 "$i"
                mkdir -p converted
                exiftool -overwrite_original_in_place -tagsfromfile "$i" ${base}.tiff
                exiftool -overwrite_original_in_place -tagsfromfile "$i" ${base}_0.tiff
                mv ${base}.tiff converted 2> /dev/null
                mkdir -p coll-$base coll-$base-large
                echo "Upscaling"
                for f in ${base}_*.tiff
                do
                        convert -scale "133%" -sharpen 1.25x0.75 $f coll-${base}-large/${f:r}-large.tiff
                        exiftool -overwrite_original_in_place -tagsfromfile "$i" coll-${base}-large/${f:r}-large.tiff
                done
                mv ${base}_*tiff coll-$base 2> /dev/null
        done
        echo "Blending each directory"
        for i in coll-*
        do
          (cd $i && align_image_stack -a "temp_$i_" *.tif? && enfuse -o "fused_$i.tiff" temp_$base_*.tif \
           -d 16 \
           --saturation-weight=0.1 --entropy-weight=1 \
           --contrast-weight=0.1 --exposure-weight=1)
        done
        echo "Preparing processed versions"
        mkdir processed
        (
                cd processed && ln -s ../coll*/f*f . && ln -s ../converted/*f .
        )
        echo "All done"
}

Here’s how the results are organized:

  • we start from a directory with source PEF and/or DNG RAW files in it
  • for each RAW file found, we take the filename stem and call it $base
  • each RAW is converted into two directories, coll-$base/ consisting of the TIFF files and fused_$base.tiff, the results of aligning and enfuse-ing
  • for each coll-$base there is a corresponding coll-$base-large/ with all the TIFF images upscaled 1.33 (linear) times before align+enfusing
    This gives the perfect blend of super-resolution and HDR when shooting hand-held
    The sharpening coefficients given to ImageMagick’s convert(1) command have been chosen from a grid comparison; again the JPEG conversion is one of the largest showing greatest image detail.
  • In the case of RAW files only containing one frame, it is moved into converted/ instead for identification
  • All the processed outptus (single and fused) are collated into a ./processed/ subdirectory
  • EXIF data is explicitly maintained at all times.

The result is a directory of processed results with all the RAW conversion performed using consistent parameters (in particular, white-balance and exposure come entirely from the camera only) so, apart from correcting for lens aberrations, anything else is an artistic decision not a technical one. Point darktable at the processed/ directory and off you go.

All worries about how well “the camera” or “the RAW converter” handle motion in the subject in pixel-shift mode are irrelevant when you take explicit control over it yourself using enfuse.

Happy Conclusion: whether I’m shooting single frames in a social setting, or walking around doing hand-held HDR, or taking my time to use a tripod out in the landscape (each situation being a user preset on the camera), the same one command suffices to produce optimal RAW conversions.


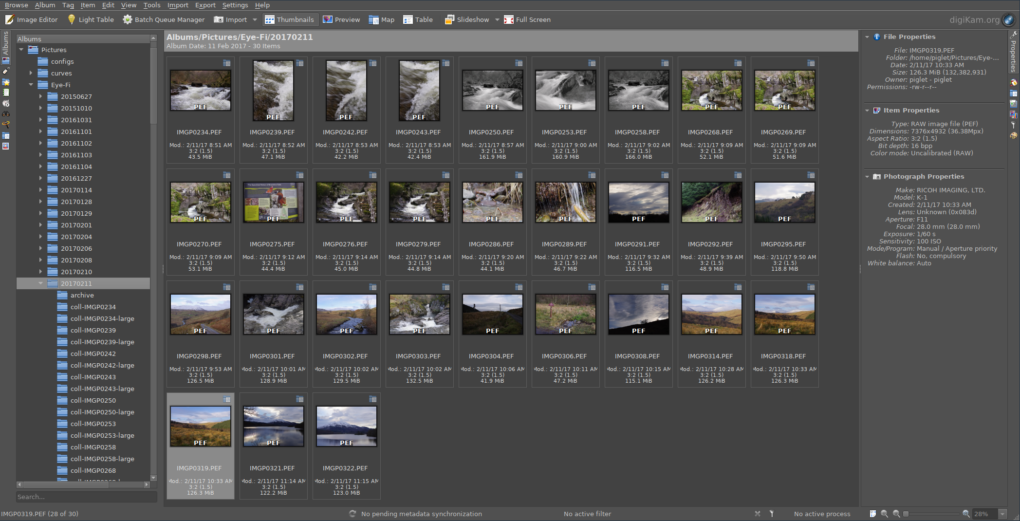
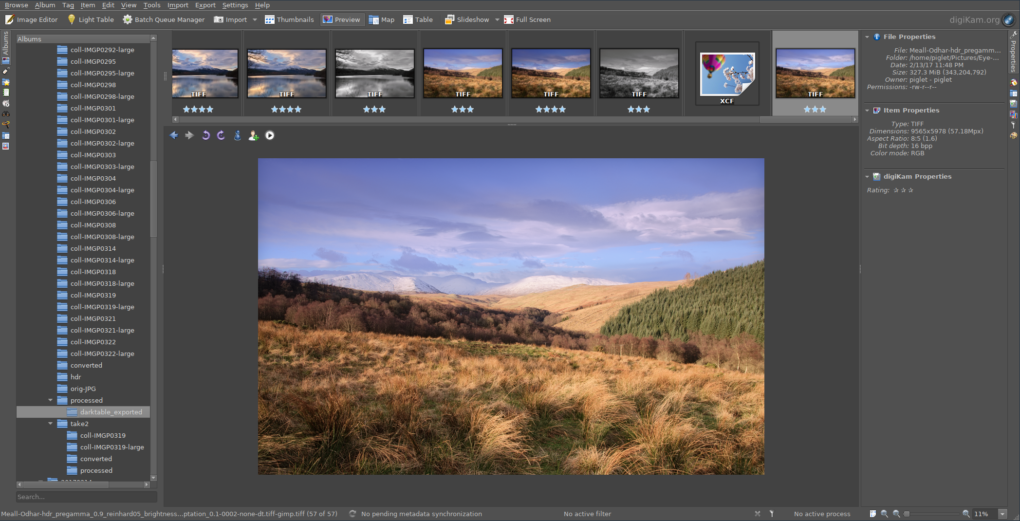
digiKam showing a directory of K-1 RAW files ready to be converted

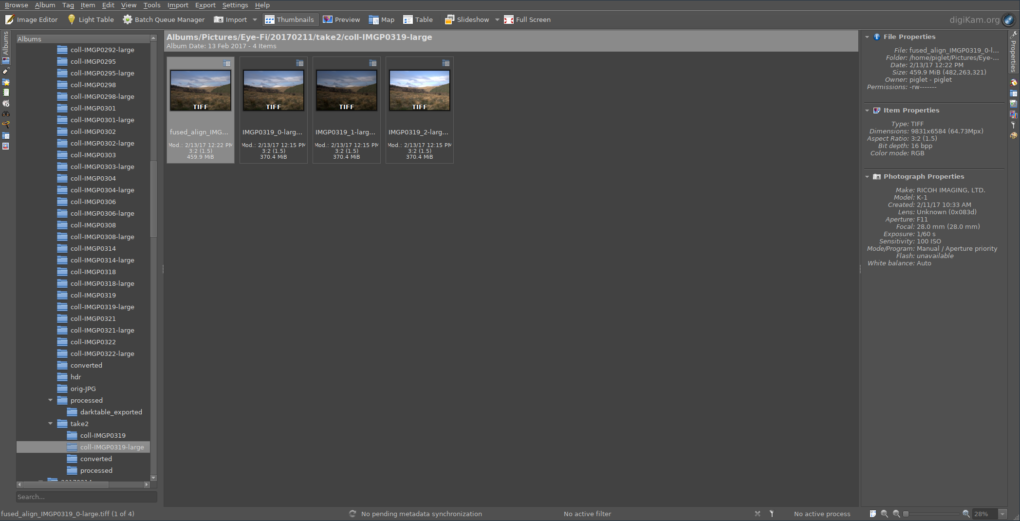
One of the intermediate directories, showing 1.33x upscaling and HDR blending

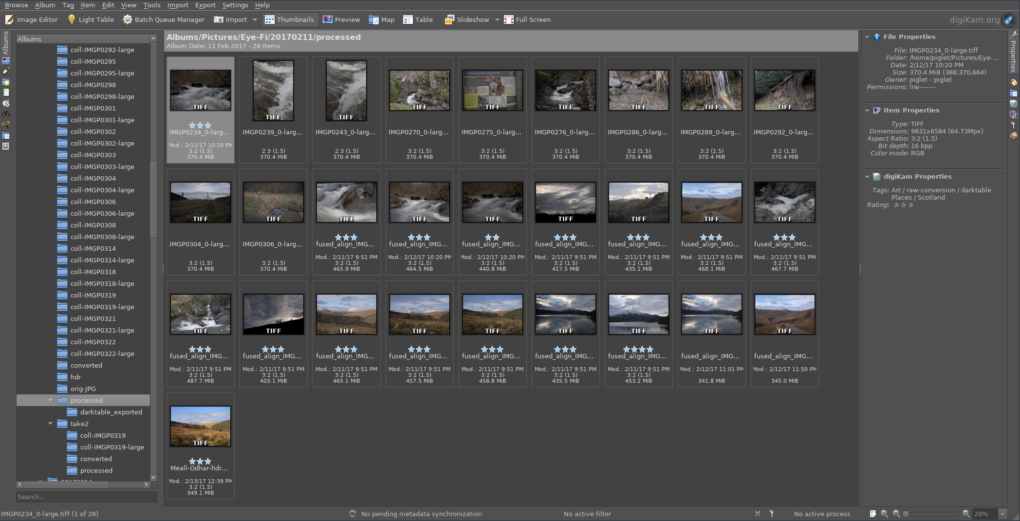
Results of converting all RAW files – now just add art!

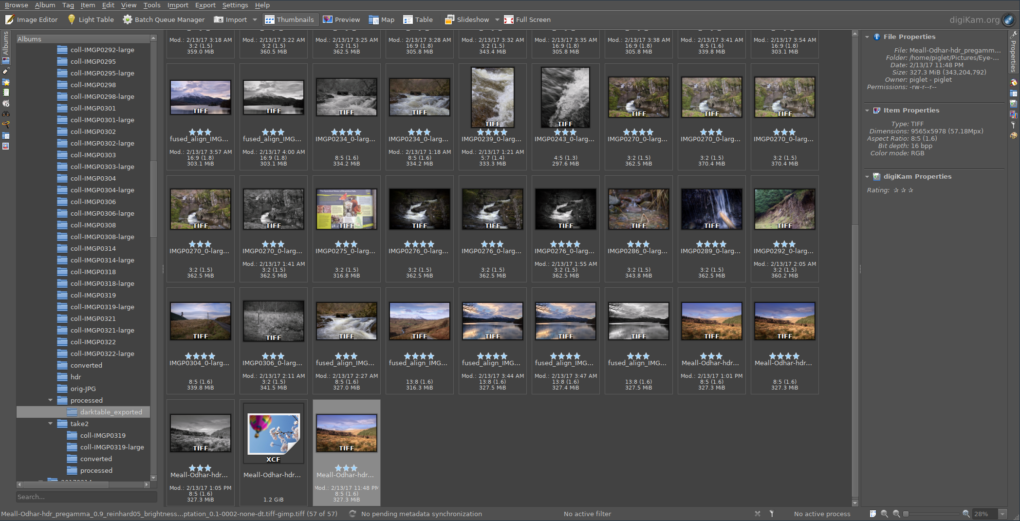
The results of running darktable on all the processed TIFFs – custom profiles applied, some images converted to black+white, etc

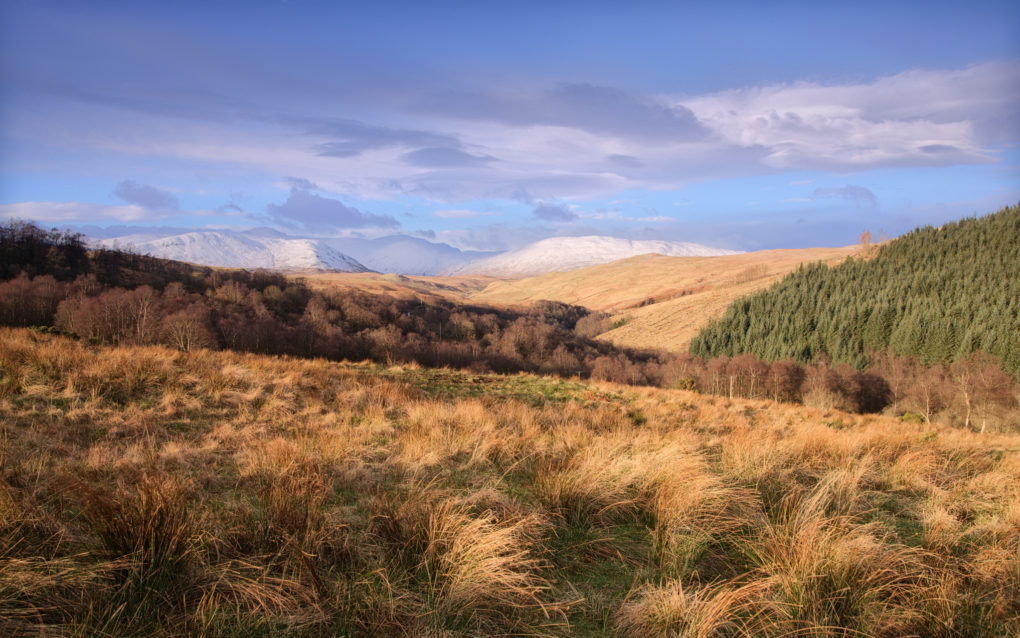
One image was particularly outstanding so has been processed through LuminanceHDR and the Gimp as well

Meall Odhar from the Brackland Glen, Callander

eBay + PayPal: Considered Harmful

I forget exactly when I made my first purchase from eBay, but given how my PayPal account was registered in 2005, my usage of both sites certainly dates back over 10 years.

Most of my transactions were simple purchases – old-fashioned (M42-fit) lenses for various cameras, although there were a few sales (again, mostly old camera gear for which I had no use).

Over that time, as a humble consumer, I accumulated a 100% positive feedback score of 92.

Now this is the part where the story turns sad.

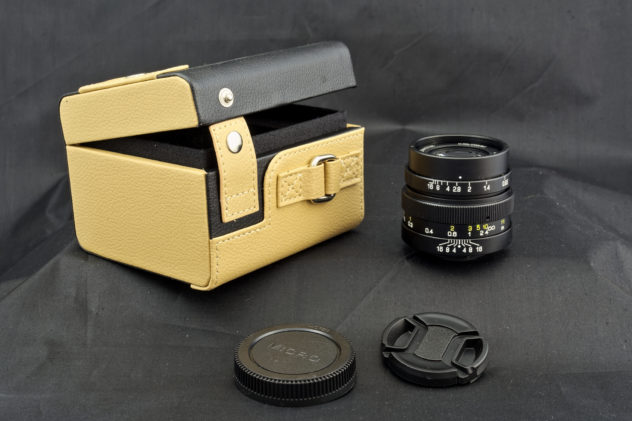
Offending lens

Last year, thinking to experiment with what it might do for my photography, I bought a 25mm f/0.95 lens. It arrived, perfectly functional; it was just that we didn’t really get along. The lens wasn’t particularly sharp – had glowing edge halos wide-open – and not even f/0.95 gives sufficiently narrow DoF to be interesting in the landscape – it just makes the whole thing look soft.

So I put the lens back on eBay. It sold first time, for a significant proportion of the initial cost. Bingo, I thought, wrapped it up and posted it off using eBay’s global shipping programme on its way to Germany.

Nearly a month later, however, the buyer opened a request to return the lens, claiming it was broken.

Well it wasn’t, when it left here, of that I’m certain; I just don’t have a photo to prove it, unfortunately. Either it was broken in transit or the buyer was clumsy with it himself.

Here’s where the problems start. eBay’s website is old and clunky. Every single email they sent with links to “see more details” were links to ebay.de, their German site, requiring me to enter my eBay login details on a page written in German. (“Einloggen!”) Pretty obviously, this was not going to happen – in equal parts, it looks like a phishing scam and I wouldn’t have the German with which to follow through even if I did log in.

Coupled with this, the buyer’s return request did not appear in eBay’s regular messaging system – it’s a semi-related sub-system of its own.

I requested what support I could find on eBay; a lady called me back within a couple of minutes and said it was up to me to try and sort matters directly with the buyer and then I wouldn’t be able to do anything for a fortnight when I could raise a case. I mentioned the language barrier, but subsequent emails persisted in sending me to ebay.de.

I never did get the chance to raise a case; with their language barriers, clunky old-fashioned website and “support” system that goes to extreme lengths to keep users locked in reading FAQs instead of establishing contact with a human, to all intents and purposes eBay denied me any right to reply.

During this time, Paypal adjusted the balance on my account – set it to -£286 when it had been at zero previously, citing the ongoing ebay dispute. I emphasize that this was before eBay had stated any resolution on the matter; they simply adjusted the balance out of the blue. During this time the website would not let me make any amendments to the account; given how this happened before resolution on eBay, I limited potential damages by pulling Paypal’s direct-debit mandates with my banks.

The buyer sent me a rude message demanding to know “what was wrong with me” that I would not reply to the return request. He then opened a case himself. Again, I had no right of reply due to the same language barriers.

After a mere 48 hours more, eBay claimed to have “made a final decision” and found in the buyer’s favour. At that point I managed to see the details of the case the buyer had raised; he had included a photo of the lens showing distorted shutter blades and a note from a local shop certifying it was broken. Of course that doesn’t prove anything; it just confirms it was broken and from what I can make out of the serial number, eliminates the chance of it being a scam to replace the lens.

Paypal claim to have “buyer protection” but say nothing about protecting sellers. There was nothing I could do apart from send Paypal a cheque for the outstanding amount and terminate both accounts as soon as possible.

Today I noticed eBay had allowed the buyer to leave me negative feedback – the first and only such event in over 11 years’ dealing with the site – while still denying me the opportunity to respond, only presenting the options to leave him positive feedback or “leave feedback later”.

Having trouble logging in? Not really, any more; no.

Unsurprisingly, I find this all horrendously unjust.

Closing both accounts has resulted in a veritable flurry of emails (19 today alone, at the last count) confirming removal of various bank accounts, credit cards and the termination of ongoing payment arrangements (Skype, two streaming music services, a grocery delivery company, two DNS registrars, Yahoo, Facebook and a few more).

I never made a profit selling goods on eBay – at best swapped objects for a fair consideration and often took a slight hit using better postage than required.

So what’s to be learned from the experience?

First, as a geek by trade, I look back a few years to a time when we were talking about Web-2.0 versus Web-1.0. eBay’s website is clearly a product of the Web-1.0 era, and not just with its layout: it uses whole-page impressions where AJAX would be more appropriate; with sub-systems for “returns” bolted-on to, yet incompatible with, the existing “messaging” system; with no single sign-on and nationality-specific sub-sites. It is an ghastly accident of feature-creep instead of design.

Second, as a human being, I’m deeply concerned by the faceless bureaucracy and lack of control. We get accustomed to “just stick it on eBay”, reliant on there always being someone who wants stuff. Contrarily, there are also local shops with whom one can come to part-exchange arrangements.

eBay and PayPal represent the first and largest and best-known steps towards a digital economy. It is easy to be suckered into thinking it necessary to have accounts with them for ease of shopping and transferring money around the place. However, when I see how unjust the systems are, stacked against honest sellers, I can have no further dealings with either site.


And the process of rejecting them both, of realising that my ebay feedback score is not a significant measure of life, is wonderfully liberating.


Update 2017-01-18: forgot to say that, on the original auction, I had checked the box saying my policy is “no returns”. Why do eBay allow that if they proceed to completely ignore it based on the buyer’s say-so?

Ordinary Landscape

The other day, we had a proponent of “creative landscape photography” presenting at the photographic society. His results were outstanding. I even approved of some of his philosophy, which is saying something.

But … some of his decisions in the execution of that philosophy seemed off.

It’s great to hear someone ignoring the maxim “get it right in camera”, espousing instead the idea of “getting good data at the scene” and affirming the role of post-processing to polish the result instead. I believe strongly in the very same thing myself.

It seems strange that such a philosophy would lead to rejoicing in a camera’s dynamic range – no matter claiming to have recovered 4 stops from the shadows, it would still have been done better by HDR at the scene – where the data comes from photons working in the hardware’s optimum performance zone.

It seems strange that one would criticize such a camera for “not seeing the same way we do”, and go on to say that we need to enhance the impression of depth by using lower contrast in the distance.
The sensor’s response curve is smooth; it will accurately reflect the relative contrast in areas by distance. The only way it would not is if one’s processing were to actively include tonemapping with localized contrast equalization. Left to its own devices, the result will accurately reflect what it was like to be there – one of the greater compliments a landscape photographer could receive.

The problem is not with the landscape; it’s with the way that photography should aspire to relate to the landscape. “Creative” seems to be a euphemism for multiplying and enhancing every aspect, be it strong foreground (make it a yet stronger perspective with a tilt lens), contrasty light (more contrast slider), colour (still more saturation and vibrace to breaking point) and so on. The results create impact but without story or message; visual salt without an underpinning of a particular taste.

Of course we know that “realism” is a phantom. It’s true that no camera will capture quite the same as anyone sees. However, let me introduce a new word: believability, precisely the quality that one could have been there at the same time. That seems like a valid goal.

Have some believable landscape images – they mean a little to me; that suffices.

Too-Big Data? That don’t impress me much

On a whim, I spent the evening in Edinburgh at a meetup presentation/meeting concerning Big Data, the talk given by a “Big Data hero” (IBM’s term), employed by a huge multinational corporation with a lot of fingers in a lot of pies (including the UK Welfare system).

I think I was supposed to be awed by the scale of data under discussion, but mostly what I heard was all immodest massive business-speak and buzzwords and acronyms. A few scattered examples to claim “we did that”, “look at the size of our supercomputer”, but the only technical word he uttered all evening was “Hadoop”.

In the absence of a clear directed message, I’ve come away with my own thoughts instead.

So the idea of Big Data is altogether a source of disappointment and concern.

There seems to be a discrepancy: on the one hand, one’s fitbit and phone are rich sources of data; the thought of analyzing it all thoroughly sets my data-geek senses twitching in excitement. However, the Internet of Things experience relies on huge companies doing the analysis – outsourced to the cloud – which forms a disjoint as they proceed to do inter-company business based on one’s personal data (read: sell it, however aggregated it might be – the presenter this evening scoffed at the idea of “anonymized”), above one’s head and outwith one’s control. The power flows upwards.

To people such as this evening’s speaker, privacy and ethics are just more buzzwords to bolt on to a “data value pipeline” to tout the profit optimizations of “data-driven companies”. So are the terms data, information, knowledge and even wisdom.

But I think he’s lost direction in the process. We’ve come a long way from sitting on the sofa making choices how to spend the evening pushing buttons on the mobile.

And that is where I break contact with The Matrix.

I believe in appreciating the value of little things. In people, humanity and compassion more than companies. In substance. In the genuine kind of Quality sought by Pirsig, not as “defined” by ISO code 9000. Value may arise from people taking care in their craft: one might put a price on a carved wooden bowl in order to sell it, but the brain that contains the skill required to make it is precious beyond the scope of the dollar.

Data is data and insights are a way to lead to knowledge, but real wisdom is not just knowing how to guide analysis – it’s understanding that human intervention is sometimes required, and knowing when to deploy it, awareness, critical thinking to see and choose.

The story goes that a salesman once approached a pianist, offering a new keyboard “with eight nuances”. The response came back: “but my playing requires nine”.

Knowing Your Lenses

Analysing Lens Performance

Background

Typically, when a manufacturer produces new lenses, they include an MTF chart to demonstrate the lens’s performance – sharpness measured as the number of line-pairs per millimetre it can resolve (to a given contrast tolerance), radially and sagitally, varying with distance from the centre of the image. While this might be useful before purchasing a lens, it does not make for easy comparisons (what if another manufacturer uses a different contrast tolerance?) nor does it necessarily well reflect the use to which it’ll be put in practice. (What if they quote a zoom’s performance at 28mm and 70mm f/5.6, but you shoot it most at 35mm f/8? Is the difference between radial and sagittal sharpness useful for a real-world scene?)
Further, if your lens has been around in the kit-bag a bit, is its performance still up to scratch or has it gone soft, with internal elements slightly out of alignment? When you’re out in the field, does it matter whether you use 50mm in the middle of a zoom or a fixed focal-length prime 50mm instead?
If you’re shooting landscape, would it be better to hand-hold at f/5.6 or stop-down to f/16 for depth of field, use a tripod and risk losing sharpness to diffraction?
Does that blob of dust on the front element really make a difference?
How bad is the vignetting when used wide-open?

Here’s a fairly quick experiment to measure and compare lenses’ performance by aperture, two ways. First, we design a test-chart. It’s most useful if the pattern is even across the frame, reflecting a mixture of scales of detail – thick and thin lines – at a variety of angles – at least perpendicular and maybe crazy pseudo-random designs. Here’s a couple of ideas:

Method

Decide which lenses, at which apertures, you want to profile. Make your own design, print it out at least A4 size, and affix it to a wall. We want the lighting to be as even as possible, so ideally use indoor artificial light after dark (ie this is a good project for a dark evening). Carefully, set up the camera on a tripod facing the chart square-on, and move close enough so the test-chart is just filling the frame.

Camera settings: use the lowest ISO setting possible (normally around 100), to minimize sensor noise. Use aperture-priority mode so it chooses the shutter-speed itself and fix the white-balance to counteract the indoor lighting. (For a daylight lightbulb, use daylight; otherwise, fluorescent or tungsten. Avoid auto-white-balance.)
Either use a remote-release cable or wireless trigger, or enable a 2-second self-timer mode to allow shaking to die down after pushing the shutter. Assuming the paper with the test-chart is still mostly white, use exposure-compensation (+2/3 EV).
For each lens and focal-length, start with the widest aperture and close-down by a third or half a stop, taking two photos at each aperture.
Open a small text-document and list each lens and focal-length in order as you go, along with any other salient features. (For example, with old manual prime lenses, note the start and final apertures and the interval size – may be half-stops, may be third of a stop.)
Use a RAW converter to process all the images identically: auto-exposure, fixed white-balance, and disable any sharpening, noise-reduction and rescaling you might ordinarily do. Output to 16-bit TIFF files.

Now, it is a given that a reasonable measure of pixel-level sharpness in an image, or part thereof, is its standard deviation. We can use the following Python script (requires numpy and OpenCV modules) to load image(s) and output the standard deviations of subsets of the images:

#!/usr/bin/env python

import sys, glob, cv, cv2
import numpy as np

def imageContrasts(fname):
  img = cv2.imread(fname, cv.CV_LOAD_IMAGE_GRAYSCALE)
  a=np.asarray(img)
  width=len(img[0])
  height=len(img[1])
  half=a[0:height//3, 0:width//3]
  corner=a[0:height//8, 0:width//8]
  return np.std(a), np.std(half), np.std(corner)

def main():
	files=sys.argv[1:]
	if len(files)==0:
		files=glob.glob("*.jpg")
	for f in files:
		co,cc,cf=imageContrasts(f)
		print "%s contrast %f %f %f" % (f, co, cc, cf)

if __name__=="__main__":
	main()

We can build a spreadsheet listing the files, their apertures and sharpnesses overall and in the corners, where vignetting typically occurs. We can easily make a CSV file by looping the above script and some exiftool magic across all the output TIFF files:

bash$ for f in *.tif
do
ap=$(exiftool $f |awk '/^Aperture/ {print $NF}' )
speed=$( exiftool $f |awk '/^Shutter Speed/ {print $NF}' )
conts=$(~/python/image-interpolation/image-sharpness-cv.py $f | sed 's/ /,/g')
echo $f,$ap,=$speed,$conts
done

Typical output might look like:

P1440770.tif,,=1/20,P1440770.tif,contrast,29.235214,29.918323,22.694936
P1440771.tif,,=1/20,P1440771.tif,contrast,29.253372,29.943765,22.739748
P1440772.tif,,=1/15,P1440772.tif,contrast,29.572350,30.566767,25.006098
P1440773.tif,,=1/15,P1440773.tif,contrast,29.513443,30.529055,24.942437

Note the extra `=’ signs; on opening this in LibreOffice Spreadsheet, the formulae will be evaluated and fractions converted to floating-point values in seconds instead. Remove the spurious `contrast’ column and add a header column (fname,aperture,speed,fname,overall,half,corner).

Analysis

Let’s draw some graphs. If you wish to stay with the spreadsheet, use a pivot table to average the half-image contrast values per aperture per lens and work off that. Alternatively, a bit of interactive R can lead to some very pretty graphs:

> install.package(ggplot2)
> library(ggplot2)
> data<-read.csv("sharpness.csv") 
> aggs<-aggregate(cbind(speed,entire,third,corner) ~lens+aperture, data, FUN=mean)
> qplot(aggs$aperture, aggs$third, col=aggs$lens, data=aggs, asp=.5)+geom_smooth()

This will give a comparison of overall sharpness by aperture, grouped by lens. Typically we expect every lens to have a sweetspot aperture at which it is sharpest; my own examples are no exception: third There are 5 lenses at play here: a kit 14-42mm zoom, measured at both 30mm and 42mm; a Minolta Rokkor 55mm prime; a Pentacon 30mm prime; and two Pentacon 50mm f/1.8 prime lenses, one brand new off eBay and one that’s been in the bag for 4 years.
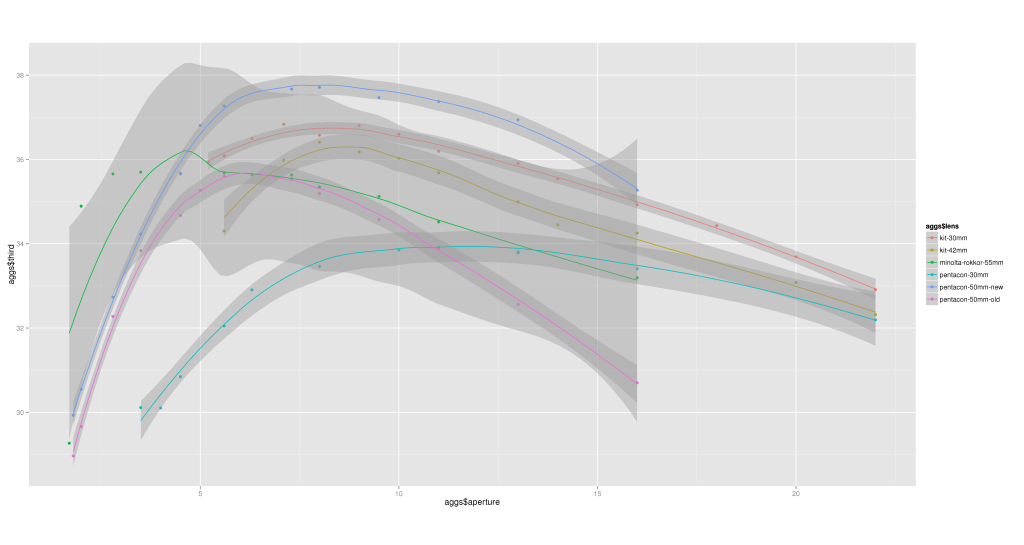
The old Pentacon 50mm was sharpest at f/5.6 but is now the second-lowest at almost every aperture – we’ll come back to this. The new Pentacon 50mm is sharpest of all the lenses from f/5 onwards, peaking at around f/7.1. The kit zoom lens is obviously designed to be used around f/8; the Pentacon 30mm prime is ludicrously unsharp at all apertures – given a choice of kit zoom at 30mm or prime, it would have to be the unconventional choice every time. And the odd one out, the Rokkor 55mm, peaks at a mere f/4.

How about the drop-off, the factor by which the extreme corners are less sharp than the overall image? Again, a quick calculation and plot in R shows:

> aggs$dropoff < - aggs$corner / aggs$third
> qplot(aggs$aperture, aggs$dropoff, col=aggs$lens, data=aggs, asp=.5)+geom_smooth()
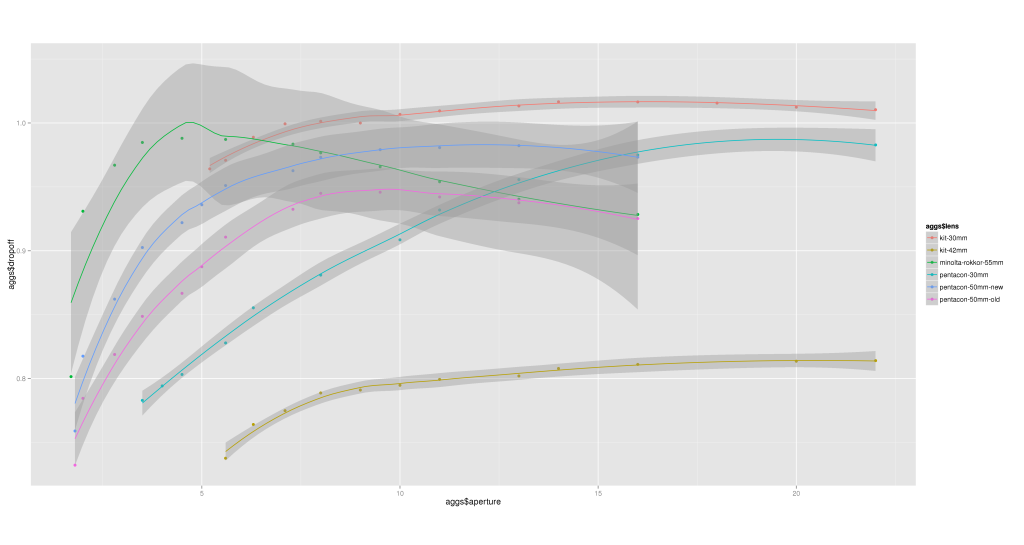
dropoff Some observations:

  • all the lenses show a similar pattern, worst vignetting at widest apertures, peaking somewhere in the middle and then attenuating slightly;
  • there is a drastic difference between the kit zoom lens at 30mm (among the best performances) and 42mm (the worst, by far);
  • the old Pentacon 50mm lens had best drop-off around f/8;
  • the new Pentacon 50mm has least drop-of at around f/11;
  • the Minolta Rokkor 55mm peaks at f/4 again.

So, why do the old and new Pentacon 50mm lenses differ so badly? Let’s conclude by examining the shutter-speeds; by allowing the camera to automate the exposure in aperture-priority mode, whilst keeping the scene and its illumination constant, we can plot a graph showing each lens’s transmission against aperture.

> qplot(aggs$aperture, log2(aggs$speed/min(aggs$speed)), col=aggs$lens, data=aggs, asp=.5)+geom_smooth()
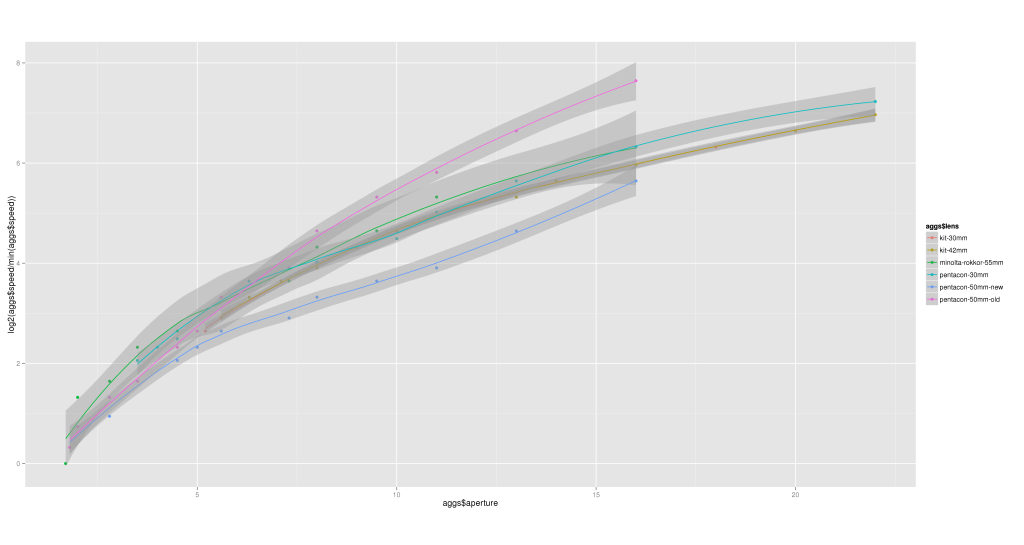
speed Here we see the new Pentacon 50mm lens seems to require the least increase in shutter-speed per stop aperture, while, above around f/7.1, the old Pentacon 50mm lens requires the greatest – rocketing off at a different gradient to everything else, such that by f/11 it’s fully 2 stops slower than its replacements.

There’s a reason for this: sadly, the anti-reflective coating is starting to come off in the centre of the front element of the old lens, in the form of a rough circle approximately 5mm diameter. At around f/10, the shutter iris itself is 5mm, so this artifact becomes a significant contributor to the overall exposure.

Conclusion

With the above data, informed choices can be made as to which lens and aperture suit particular scenes. When shooting a wide-angle landscape, I can use the kit zoom at f/8; for nature and woodland closeup work where the close-focussing distance allows, the Minolta Rokkor 55mm at f/4 is ideal.