Glen Artney

Just one photo from a quick afternoon excursion to explore Glen Artney earlier in the year. Well, one photo, processed 3 ways.

This was the first, and so far only, time I’ve felt the urge to invert the tripod centre column; in the process I discovered that the Pentax K-1 live-view display will happily invert the image correctly, but leaves all the exposure and histogram overlays the wrong way up – as if trying to use the thing upside-down was not hard enough itself! Oops.

A pleasant waterfall in the Allt na Drochaide burn, a tributary to the Water of Ruchill, Glen Artney.
This was the first, and so far only, time I’ve felt the urge to invert the tripod’s centre-column and dangle the camera millimetres above the water. In the process, I discovered a bug with the Pentax K-1: if you use live-view upside-down, the image inverts itself correctly but all the settings controls (histogram, etc) do not. It’s tricky enough wondering where the control dials have gone, let alone where the numbers they control are to be found on screen. D’oh!

My Strathearn

I’m very fond of the views along the length of Strathearn – from the Knock at Crieff or above Monzie joinery on the A822 road looking west, the view to overlapping hills in the distance is deeply pleasant.

This is an unashamed dump of a load of photos made over the course of two strolls up and down Torlum Hill outside Crieff – the first mid-afternoon with a variable-ND / polariser filter, the second immediately afterwards with a regular 2-stop circular polariser instead. The same technique has been applied to all  – auto whitebalance and handheld HDR with a 1EV bracket either way. All are presented here in chronological order to compare the difference the light and a proper filter make in the landscape.

On the way back home after strolling up and down the hill, I saw a colourful Earth’s Shadow (aka Belt of Venus) developing, just as I happened to be passing one of my favoured characterful trees outside Muthill.

Autumn at Glen Affric (1)

For about 13 years I have been of the opinion that it has not been a year without at least one trip to Glen Affric.

My favoured time is autumn, late October, to catch the trees in the Caledonian Forest reserve at their most colourful.

Arriving before sunrise, the light is all dull  and the scenery a moody shade of gloomy – the last vestiges of moon stars remaining in the cobalt blue sky.

One of my favourite scenes at Glen Affric – two ncie birch trees amongst purple and green heather.
Sadly this shot has been marred in recent years by the installation of a large wide path cutting right through the heather between bench and trees; this photo used to be easier to compose but now I’m too conscious of having to position the frame to avoid the path just below; it’s becoming too much of a trick-shot for my liking.


Slowly, over the course of an hour after the posted sunrise time, the sun will gradually rise behind Meall Dubh beyond Loch Beinn a Mheadhoinn, casting a beautiful light on the forest:

Having arrived so early, it is a delight to bask in the first proper warm sunlight of the day:

One of my favourite birches – always think it should be called “Dancer” for some reason – basking in the first warm rays of sunrise amongst the heather.

Birnham Hill

One of my favourite views is the Highland Boundary Fault running through the landscape, immediately in front of me standing at Stair Bridge Viewpoint part-way up Birnam Hill.

It looks particularly pleasant with light and cloud-shadows zipping over the trees too:

Morvern 5/4: The Road Back

And so we come to the last post in the series, a set of photos not entirely in Morvern but more on the way back up the shores of Loch Sunart and Loch Linnhe to the Corran Ferry, across and down to Loch Leven at Ballachulish.

There’s something wonderfully uplifting about rattling along these wee roads on beautiful sunny days, admiring the light.

Morvern 1/4: Approach

The West coast of Scotland – Lochaber, Argyll and further north – is well known for its amazing scenery. Earlier in the year I had a look around on Google Earth and thought the landscape looked pretty impressive opposite Mull around the Ardtornish area on the Morvern peninsula.

It certainly did not disappoint. Even having just driven 4 hours all around Fort William, across and round Loch Eil at great length (single-track road with passing places and a 60 limit), I had to stop to admire the crystal clear blue sky and lines of mountains receding into the distance:

There followed a short drive down to Loch Arienas, which was also just beautiful – blue water reflecting blue sky:

Lady Mary’s Walk, Crieff

Only catching up on photos taken at the end of April…

Lady Mary’s Walk runs West from Crieff along the side of the River Earn, mostly on the flat until one reaches the foot of Laggan Hill after a mile or so, where it forms a circular route back to MacRosty Park.

At the end of April I went for a stroll to hunt bluebells.

The path was particularly pleasant – quiet, leading on through the woods.


As an aside, I’m sure there never used to be such a profusion of wild garlic on these Perthshire woodland nature trails 10 years ago – I only first encountered the stuff whilst out in Galloway.

I was a bit early for optimum bluebell season, but did find a few areas of good blue ground coverage:

And at the western extremity of the route there is a ruined house – it could be quite eerie given the right lighting.

The Return of Serif

It feels funny to think that back in the early 1990s Serif was known for PagePlus, in the days when such things were known as desktop publishing or DTP applications.

Recently, however, they’ve produced Affinity Photo for Mac, Windows and iPad. After one or two folks recommended it, I thought it was time to add another trick to the photo-publishing workflow and have a play. After all, if nothing else, having an iPad would solve my doubts with colour-management issues on Linux, wouldn’t it?

So I’ve spent a few weeks driving around hunting scenery and taking photos of it and gradually evolving a few routines: photos are still shot on the Pentax K-1; processed (variously pixel-shift or HDR) using dcraw on Linux, where I also run them through darktable for a lot of toning work; the results are then copied to an ownCloud folder which synchronizes automagically with the iPad; a bit of juggling with share-to-Affinity and share-to-Photos and share-to-ownCloud later and the results are copied back to the workstation for final organization, checks and publication.

Within Affinity, my workflow is to import an image and ensure it’s converted to 16-bit P3 colour-space – this is a bit wider than sRGB and native to the iPad’s display. I then run the Develop module which tweaks exposure, brightness and contrast, clarity, detail, colour-balance (not so much), lens distortions, etc. After that, I use layers to remove sensor-dust and other undesirable feature. Top tip, use a new pixel layer for the in-painting tool set to “this layer and below”; then all the in-paintings can be toggled on and off to see the effect; also use a brightness+contrast adjustment layer above that while you work, so the corrections will be even less visible when the contrast is reduced back to normal. If the image requires it, I’ll add one or two fill layers for gradients – better to use an elliptical gradient that can be moved around the scene than a vignette that only applies in the corners. Finally, I merge all the layers to a visible sum-of-all-below pixel layer,on which I run the Tonemapping persona; ignoring all the standard presets (which are awful), I have a couple of my own that make black-and-white in low- and high-key targets, in which I can balance local versus global contrast. If I produce a black&white image, it probably arises from this layer directly; sometimes, dropping the post-tonemapped layer into the luminosity channel makes for a better colour image as well (subject to opacity tweaking).

So, some results. It produces colour:

It produces black and white:

One final thing: I used to hate the process of adding metadata – titles and descriptions, slogging through all my tags for the most pertinent ones, etc. Because the ownCloud layer is so slow and clunky, it makes more sense to be more selective, choose fewer photos to go through it; if I also add metadata at this stage, I can concentrate on processing each image with particular goals in mind, knowing that all future versions will be annotated correctly in advance. Freedom!

Trying something a little different

For years now, my photo-processing workflow has been 100% open-source. However, in the interests of greater portability – hack on photos whilst on the go – and partly gratuitously for the sake of variety, I recently acquired an iPad Pro 10.5″ and installed the Affinity Photo app.

As a user experience goes, it’s really quite pleasant. The best way to synchronise files around the LAN seems to be Seafile, which is open-source and available for Linux, iOS and android. My Linux-based workflow regularly produces 64-megapixel images, working on multiple intermediate TIFF files, 16-bit ProPhotoRGB-linear; somewhat surprisingly, seafile, the iPad and Affinity Photo seem able to handle files around 450MiB in size. There are a few small gotchas – I had to import a few ICC colour profiles by hand and as yet, there doesn’t seem to be a way to customise export options (so you have to select JPEG 99% sRGB lanczos yourself afresh every time); I’m sure these things will come in time however.

So here’s a shot from last Sunday afternoon. As I was heading out of Muthill I saw this characterful old tree in a field; on the return journey a few hours later, not only was it still there but the clouds were darker in the background and the golden sunlight caught the bare branches. A very quick bit of parking and even quicker sprint back to the optimum viewpoint and it looked stunning. So I processed it a little further, realising an intention for how it should look that was apparent from the start.

Sunlit tree

Just One Photo

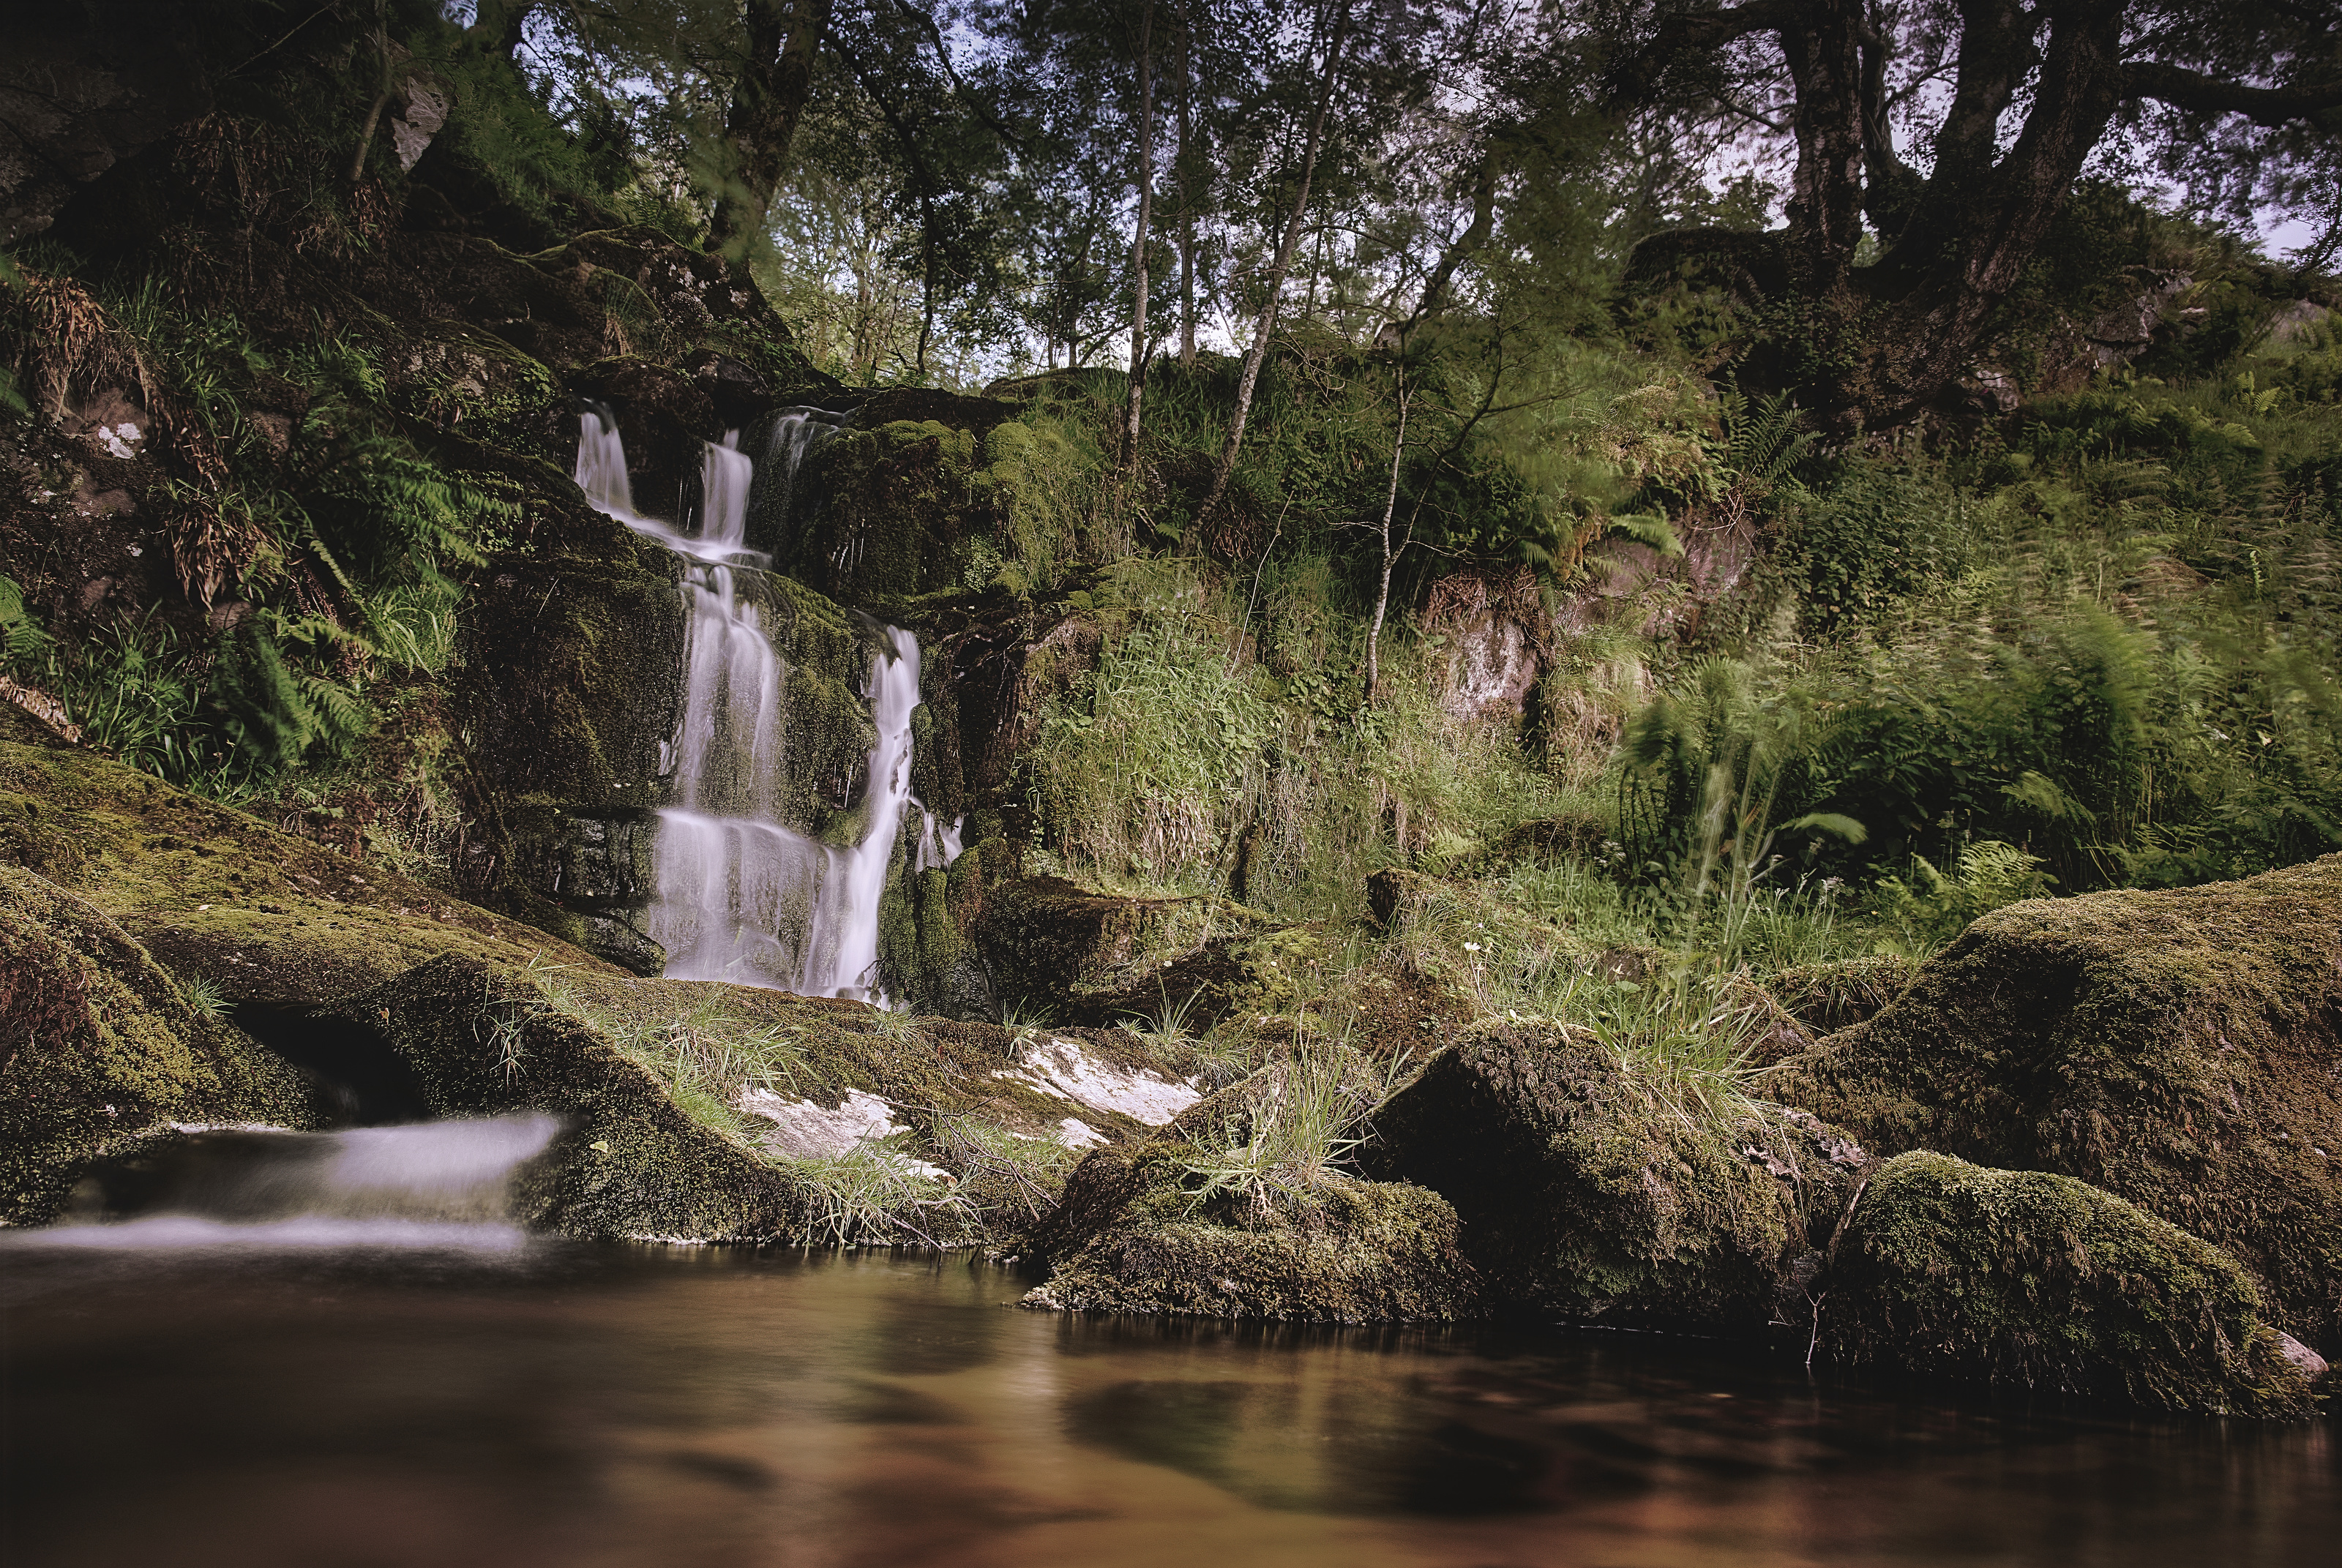
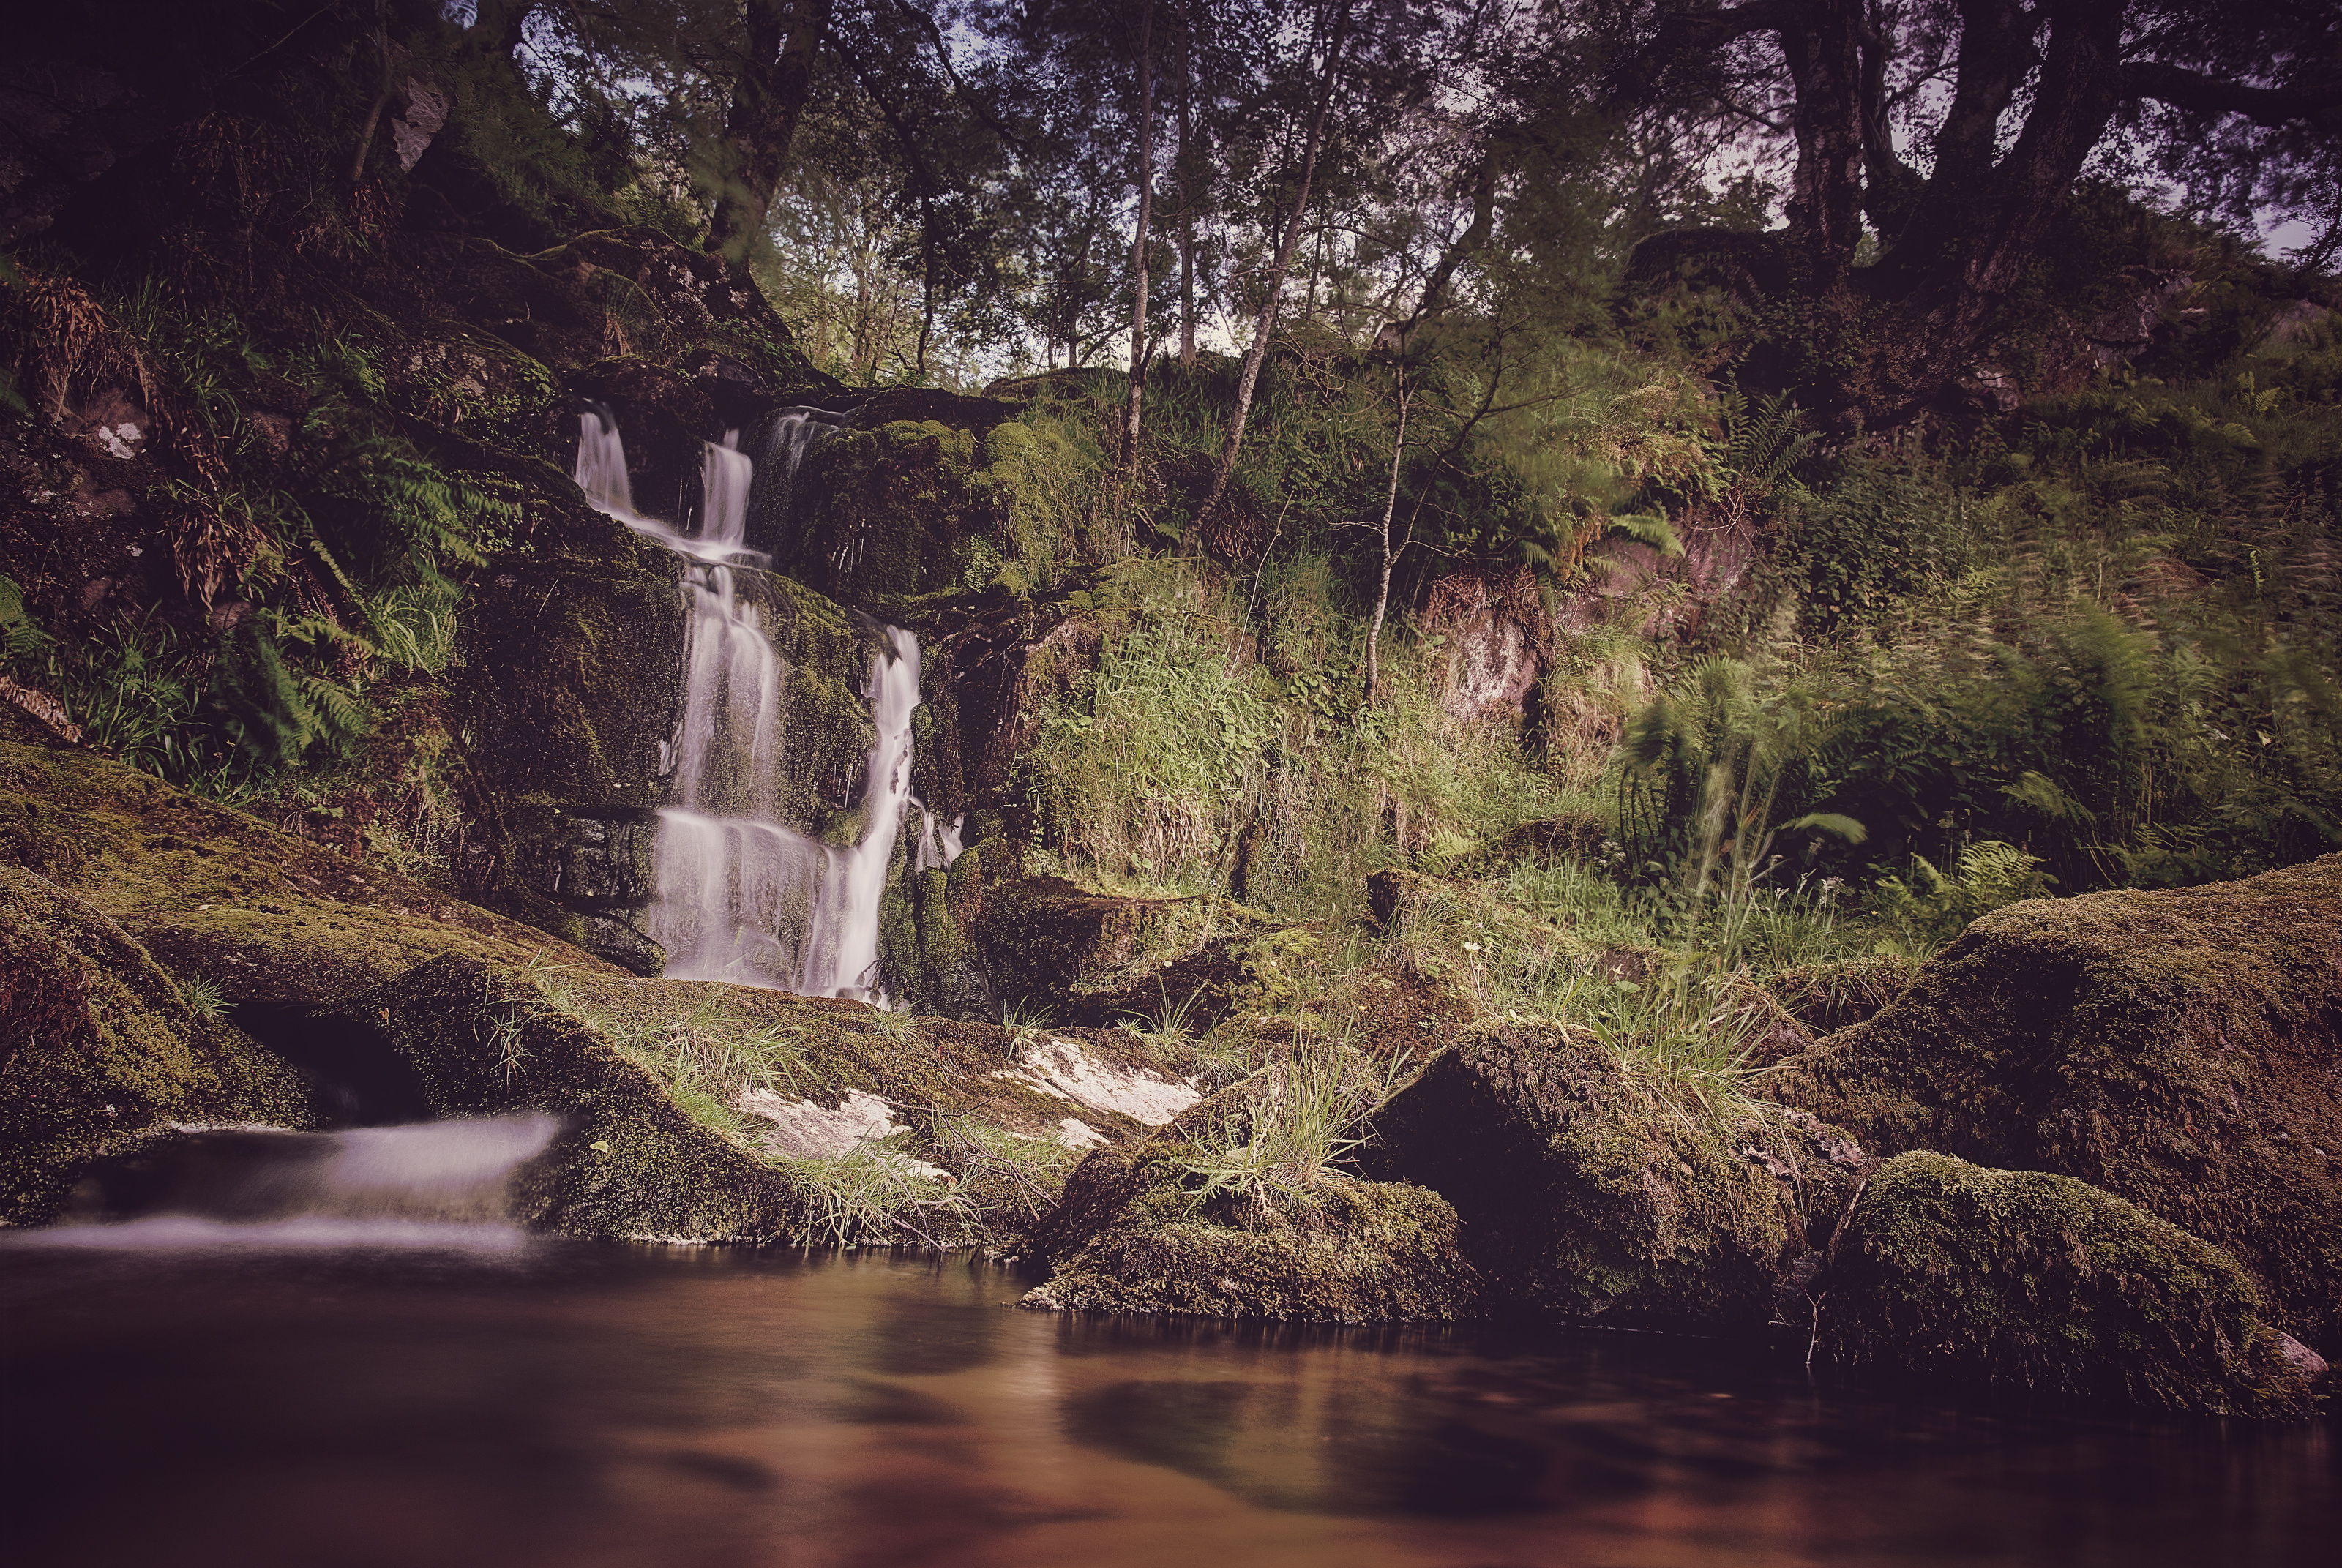
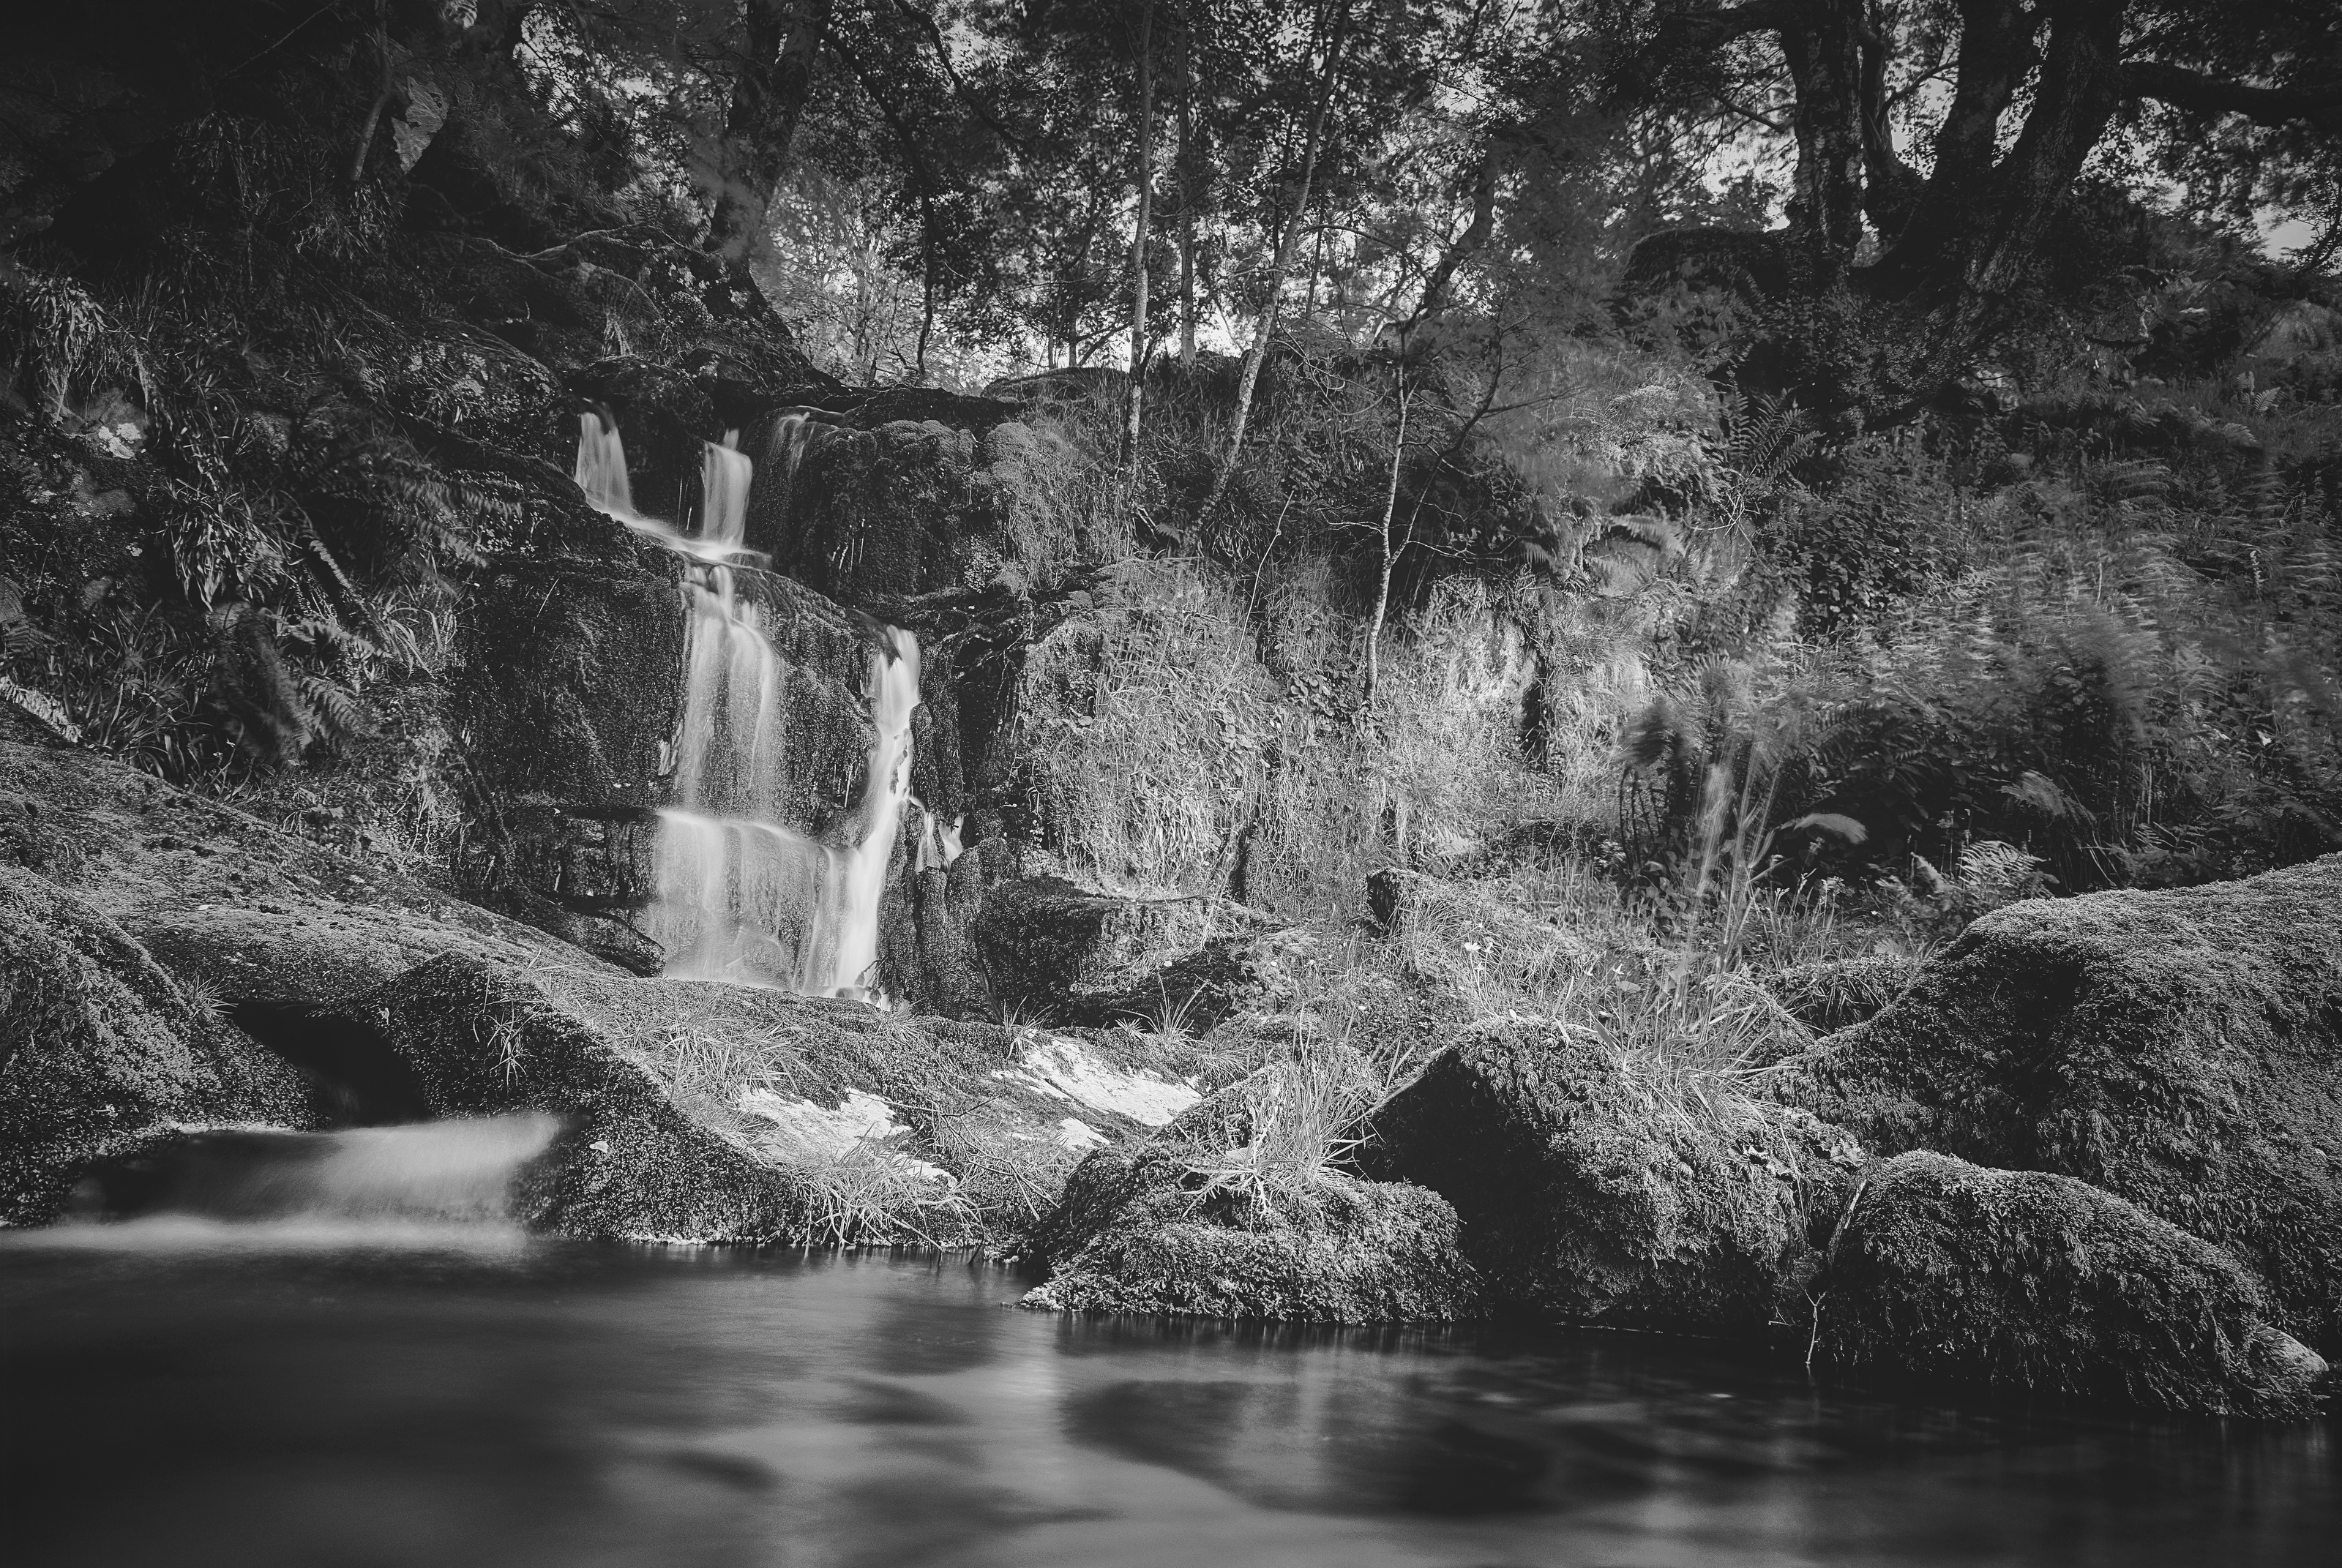
Black Spout Waterfall, Pitlochry

Some days you only need to come away with one landscape image to justify an excursion.

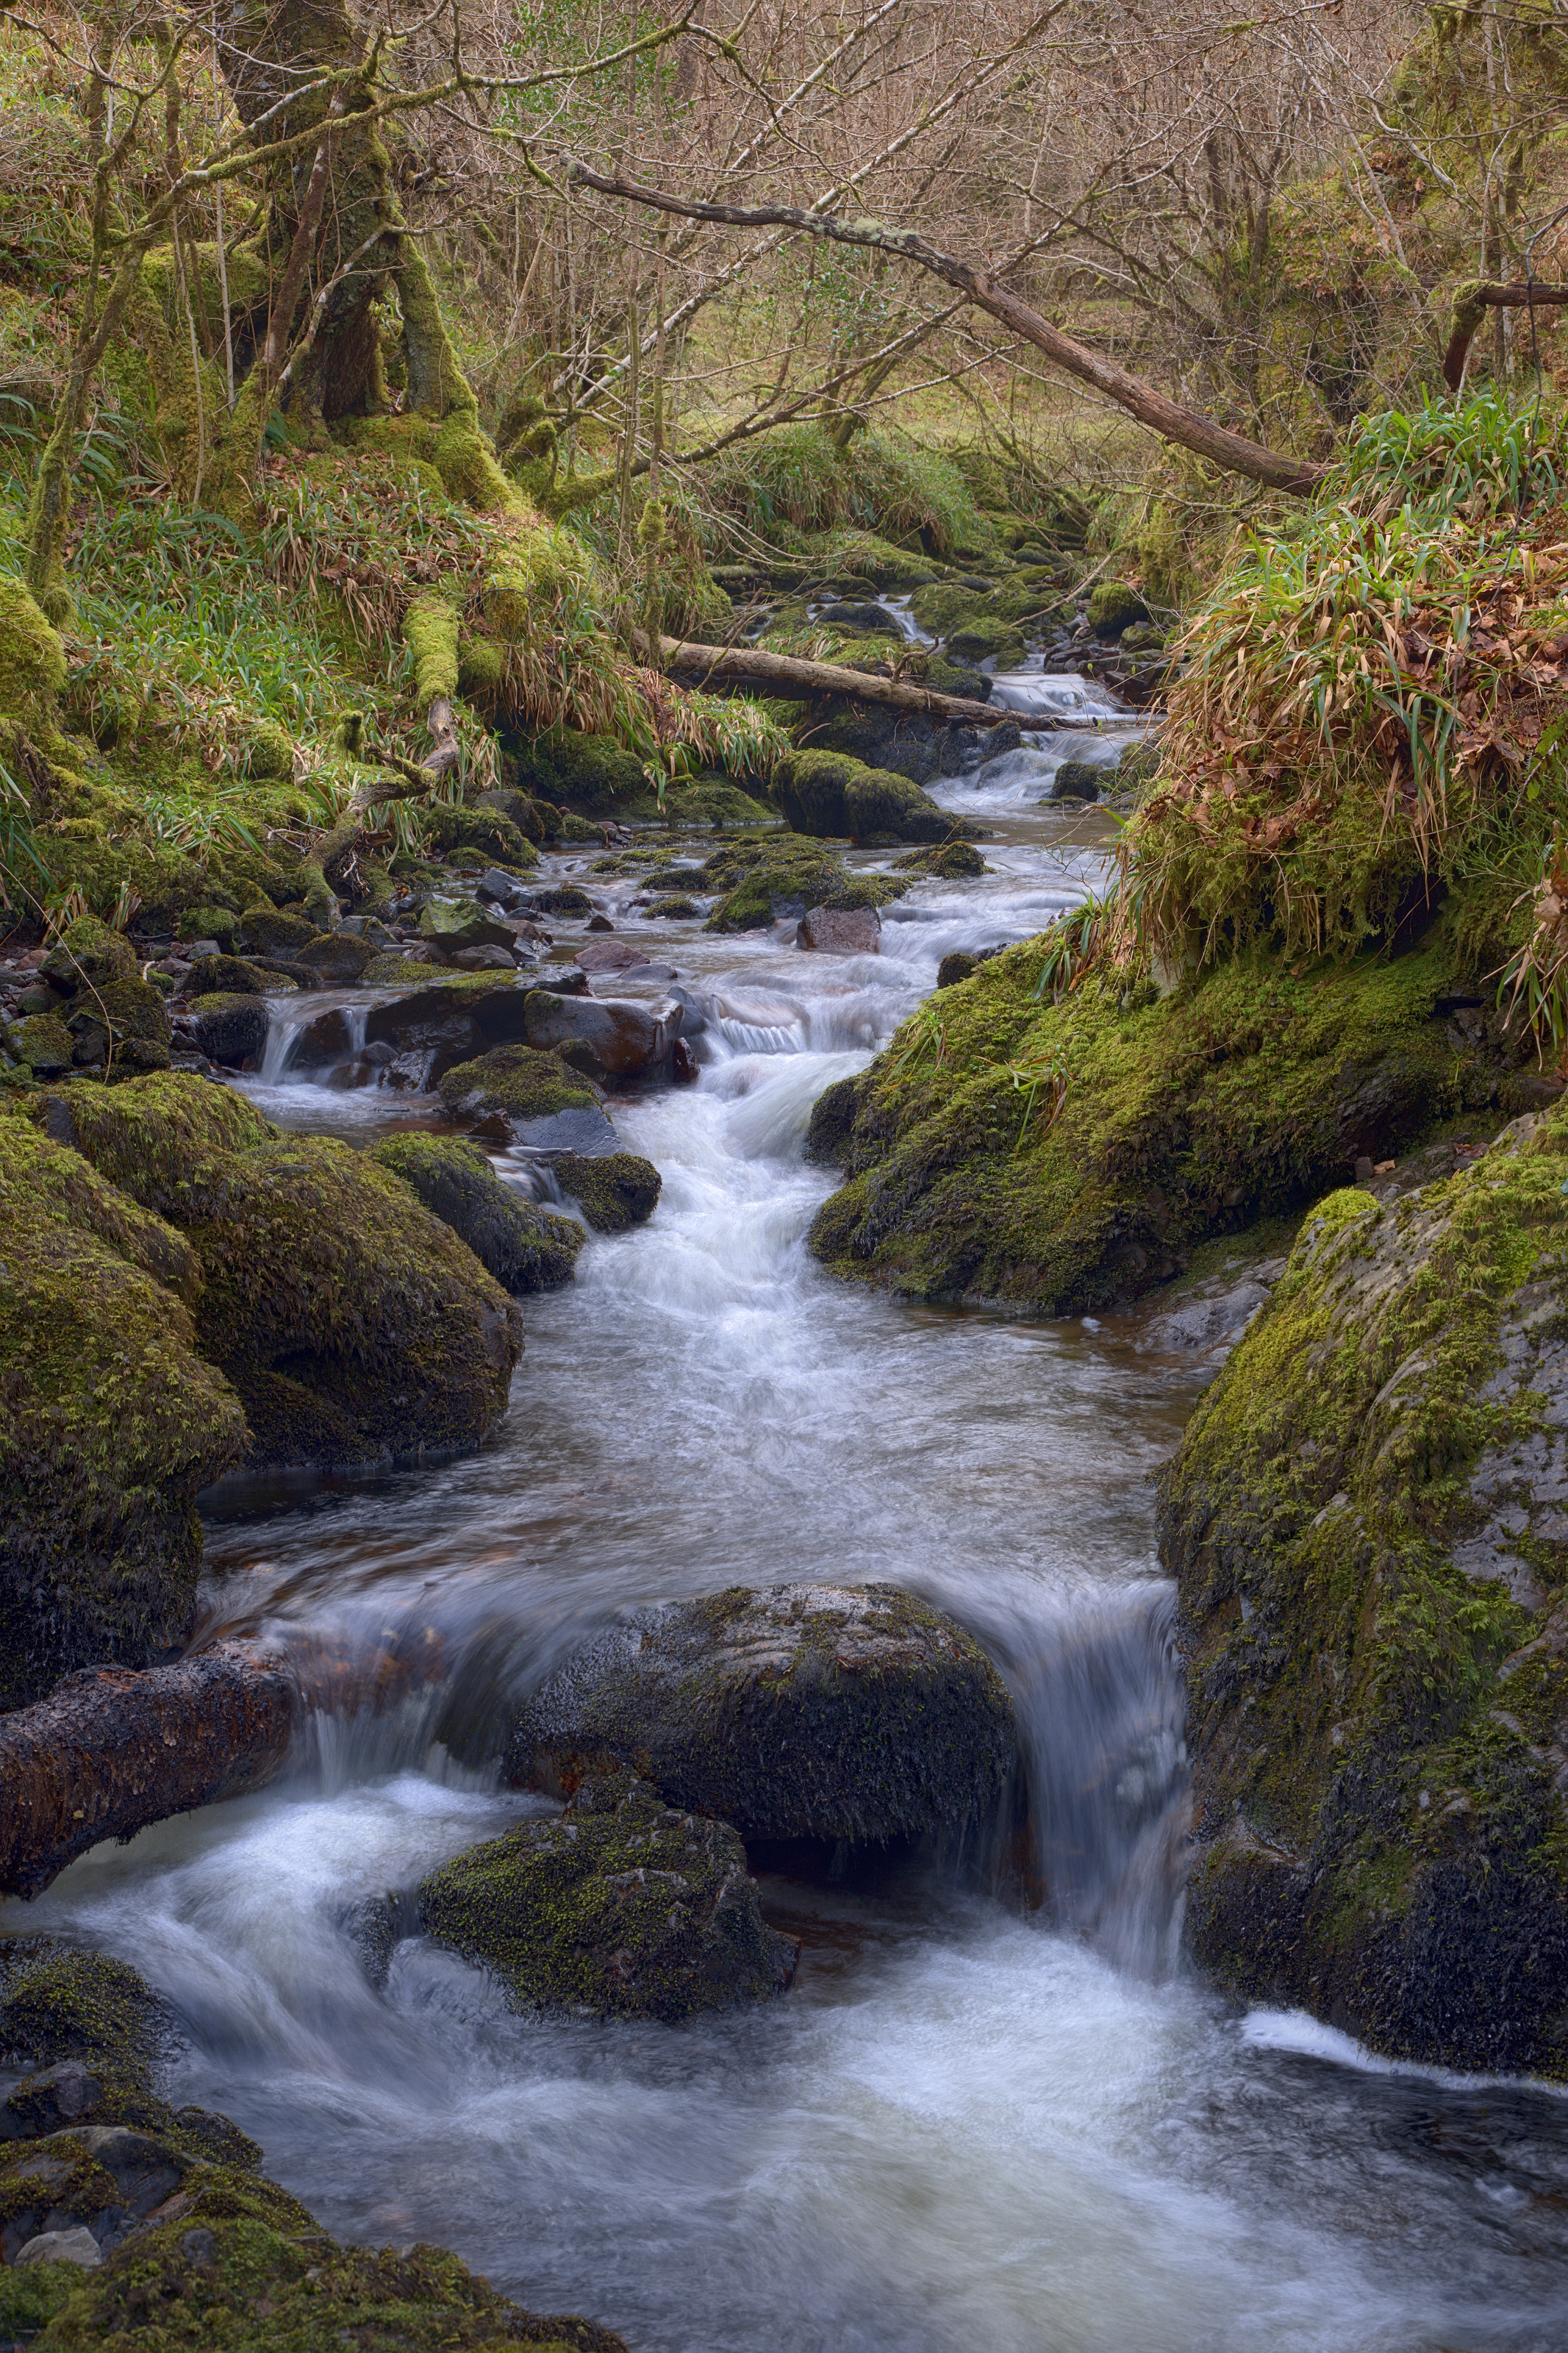
On Saturday I set sail with Doglet and a friend and strolled through Black Spout Woods around Pitlochry, up to the viewpoint across the gorge where you can see the full height of the waterfall, and then round to the more accessible bit near the top of the falls, which still takes a fair amount of scrambling around on the river bank to get down to.


A nice stroll through the woods, a view across the gorge to the full height of the waterfall, some scrambling around on the banks to get down to this level (a small fraction of the total height down from the top) with friend and dog… A good way to spend an afternoon

Technicalities:

There are three conscious aspects to this shot:

Composition

I wanted to make the most of the 15-30mm lens, so with a bit of wiggling around at the scene I found a spot right in front of the cascades that would showcase the 16mm ultra-wide field of view with a strong foreground. Nothing clipped; there’s negligible cropping except for lens-correction. There’s something in each pair of corners: the strong diagonal line of the dead tree-trunk in the foreground is echoed by the three distant trees in the far top-left; the negative space of the burnt-out sky has an echo in the expanse of run-off water in the bottom; treated as three stripes, there’s a balance between the height of the frame given to the run-off, to the bright white cascades, and to the woods+sky at the top.

Sensor controls

I made 10 source images on the Pentax K-1, varying the exposure as follows:

f/13.0 1/50s; f/14.0 1/8s;
f/16.0 0.4s; f/16.0 0.5s
f/16.0 0.5s; f/16.0 0.8s
f/16.0 1/4s; f/16.0 1/8s
f/16.0 1/8s; f/18.0 1/6s

This set of exposures spans a large contrast range from bright grey sky down to dark shadows in the rocks; it varies the shutter speed so at least a few will make the water look like brushed cotton; it varies the aperture partly to cater for the range of shutter speeds, and partly so as much of the shot as possible has a frame with maximum detail before diffraction. Enough data that enfuse could find a good midtone maximizing local entropy (detail) at every pixel.

Each of the above had pixel-shift enabled for greater resolution, totalling 40 frames of 36MPel resolution. The shutter was open for a combined total of 12s.

Post-processing

I used my open-source Pentax K-1 pixel-shift workflow on each of the 10 images above, and then reused it again to blend all 10 together into a combined HDR average. Opening this in darktable, I proceeded to correct lens-distortion, finalize the crop (16:10 aspect-ratio, one of my favourites for landscape), set detail modules (no need for noise-reduction! some balancing of detail, local detail, equalizer modules though) and exposure, toning (including tonemapping and low-pass filter) and colour (Velvia). There are not many localized modifications, but there are significant grad-ND filters both down through the trees and, opposing that diagonally, up from the bottom of the frame, along with two instances of the vignetting filter (one significant, one just clipping the corners); there is also extra local contrasted masked into an area around the dead tree trunk. Finally I opened the image in The Gimp and ran the G’Mic filter suite including colour-grading twice (once conventionally, once with extra highlight/shadow duotone effects, blended together – this has the side-effect of changing the tonality in the green leaves to make it look brighter/sunnier than it actually was). A tweak to the curves to lift the overall gamma and then I overlaid my favourite texture image, a photo of a sheet of Hahnemuehle Photo-Rag paper, in soft-light mode to soften the contrast and add a small amount of texture into otherwise barren areas.

Why this Workflow?

Working this way hits a sweet-spot in terms of convenience and image-quality.

I did not fall in the river. That’s a good start.

With such a wide field of view, every centimeter counts when choosing the location. With the 15-30mm lens I was able to experiment, iteratively varying location and focal length, until an optimum position was found, all the while seeing exactly what the final composition would be in live-view.

Pixel-shift – moving the sensor around in a 1px square pattern – works as a great way to increase the resolution.
The alternative would be to shoot a panorama, but that would still require HDR blending of frames as well as risking motion-artifacts in the trees; with just HDR on its own, the ghosting of the leaves from averaging multiple frames is a more pleasant indication of movement rather than errors in stitching. Additionally, shooting a panorama would require just as much care over camera position but would not allow a preview of the composition.
As a hybrid option, with cameras that lack pixel-shift or equivalent technology, one could compose approximately and then vary the tripod position subtly to emulate hand-held camera-shake; this is almost identical to pixel-shift in terms of super-resolution, but varying the camera position risks introducing artifacts from lens-distortion and parallax between foreground and distant parts of the scene, that pixel-shift avoids.

Additionally, shooting every frame 4x over, automatically, increases the overall exposure time into multiple seconds, even in daylight, which avoids the need for Big Stopper-type filters (especially handy on a lens that would require a special holder for such).

Argyll Woodlands

One of my favoured walks around Argyll is a couple of miles south of Taynuilt, the White Ant trail around Glen Nant.

Ben Cruachan dominates the surrounding landscape – especially on a cool winter’s day:

Last summer I was pleased to fulfil a client’s requests for several of my photographs; one of the black & white prints was originally made in Glen Nant, a little burn flowing gently amongst the green undergrowth. On revisiting it, I’d forgotten how the original had been made whilst lurking, troll-like, under a small wooden bridge:

A repeat of a photo made some years ago – I’d forgotten that I was actually hiding, troll-,like under a small bridge to make the original!

No trip to Argyll would be complete without visiting old friends in Inverawe. In particular, Old Friend, my favourite willow tree, is still standing as characterful and gnarly as ever.

And all is well with the world

The Dumpling

Just to the south of Loch Lomond beside the village of Gatocharn lies Duncryne Hill – a positively cute protrusion consisting of sandstone and conglomerate from the Emsian era early in the Devonian Period, affectionately known as The Dumpling.

Having discovered it on Google Earth, thinking it might afford good views over Loch Lomond and the Highlands to the north, I visited it this past weekend.

I wasn’t disappointed.

Approaching The Dumpling

Some artwork – looking at Loch Lomond from the top of Duncryne Hill:

The Highland Boundary Fault runs from Arran to the south-west, cutting through Loch Lomond between Arden (west) to Balmaha (east), forming a clear escarpment along the side of Conic Hill.


The Highland Boundary Fault runs right through the middle of this photo – through Loch Lomond around Balmaha, causing the rising mountains to the right of the scene.

The clouds were fairly zipping along, obscuring and bathing the landscape in crepuscular rays, so I had to make a short timelapse video of the vista:

With such light and rain-clouds passing by, on returning to the top of the hill I was greeted by a dramatic full-on rainbow with complete primary and secondary bows and supernumaries glowing in super-saturated vibrant arcs over the trig-point.

And just to finish the day’s expedition, there was some beautiful early golden-hour evening sunlight back-lighting a group of trees outside Drymen.